Tuesday, November 29, 2011

Cranberry Ribbon Apple Pie

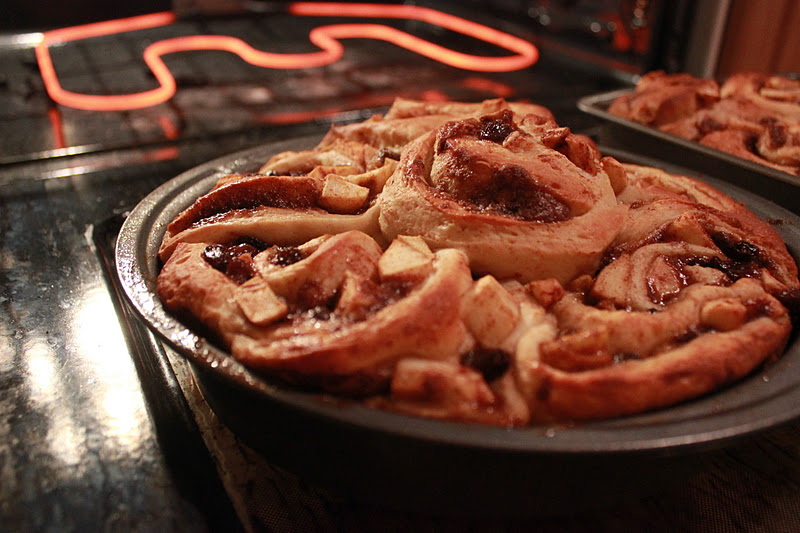
There was a curve ball this Thanksgiving: apples. Lots and lots of apples. About 4 pounds worth. I wasn't expecting apples. I was expecting the usual cry for pumpkin pie. As turns out, so does everybody else at a massive dinner party! The boy's family had a large, heartfelt gathering for dinner and everyone was gunning for the pumpkin. I was requested to bring another dish and went with the apple pie option.


There was a little pressure. For starters, we never made pie growing up! We were raised on pudding (better known as flan) and pastel de nata. I made a Strawberry-Rhubarb pie once but that was a semi-success. Secondly, but this was for the boyfriend's family and friends... you know... those people WANT to make good impression. Oh, and it's a holiday. No biggie.


After some careful research, I went with this recipe from Bon Apetit. It's your traditional apple pie with a touch of cranberry. It's super tasty because the tartness of the cranberry is a welcome contrast to the cinnamony-sweetness of the apples. The filling is fantastic because it's not over sweet and goes amazingly well with vanilla ice cream.


The crust was from Smitten's site. She has a fantastic breakdown about making crust and the importance of preserving those buttery bits. I've used it once before for a Peach and Creme Fraiche and it went over very well. You don't have to do the the hearts! I just thought they would be cute. 


All you need is a heart shaped cookie cutter. That's it!


It's not hard to make and the ingredients are grocery-store friendly. Do yourself a favor though and make the crust and cranberry's ahead of time. This way, all you have to do is put it all together the day of. And for the love of God... don't do what I did:


DO NOT forget to thaw the pie crusts the day you plan on making the pie. It's like wrestling cement.
DO NOT place all bets on finding the right pie pan size the night before at Giant.
DO NOT roll out the dough on the counter above the dish washer while it's on.

I tell you these things because I care. This pie is awesome. Make it with love. For people you love.


And for that last slice of pie... put it in the blender with a few scoops of vanilla ice cream, a splash of maple syrup, and a some milk. Blend till only a few clumps remain. Cranberry Apple Smoothie delight! We ate it too fast for the camera!!! But here's the boy's interpretation of it's yumminess.


Cranberry Ribbon Apple Pie
from Bon Appétit

1 1/2 cups plus 1 tablespoon sugar
1/2 cup 100% cranberry juice
2 cups cranberries (about 8 ounces)

2 pounds Granny Smith apples, peeled, cored, thinly sliced
1 3/4 pounds Golden Delicious apples, peeled, cored, thinly sliced
2 tablespoons all purpose flour
1 teaspoon fresh lemon juice
1/2 teaspoon ground cinnamon

2 Butter Pie Crust Dough disks (I used this recipe from Smitten)
2 tablespoons (1/4 stick) unsalted butter, cut into 1/2-inch cubes
1 teaspoon milk
Pinch of ground cinnamon
Turbinado sugar (sugar in the raw)-optional
Vanilla ice cream

Stir 3/4 cup sugar and juice in saucepan over medium-high heat. Add cranberries; bring to simmer. Reduce heat; simmer until almost all liquid is absorbed, stirring often, about 25 minutes. Cool. (Can be made 2 days ahead. Cover and chill.)

Toss all apples, flour, lemon juice, 1/2 teaspoon cinnamon, and 3/4 cup sugar in large bowl to blend.  Toss in a few cranberries if you want! Oh, and optional.. pre-bake the apples for about 15 minutes if you're worried about them cooking through.

Preheat oven to 400°F. Roll out 1 dough disk on floured surface to 13-inch round. Transfer to 9-inch deep-dish glass pie dish. Trim overhang to 1 inch. Spread cranberry mixture over crust bottom. Top with apple mixture; dot with butter. Roll out second dough disk on floured surface to 13-inch round; drape over apples. Trim overhang to 1 inch. Press crust edges together to seal; crimp. Cut 1-inch hole in center. Brush crust with milk. Mix remaining 1 tablespoon sugar and pinch of cinnamon in small bowl; sprinkle over crust along with optional turbinado.

Bake pie 15 minutes; reduce oven temperature to 375°F and bake until crust is golden, about 50 minutes. Transfer to rack; cool at least 2 hours. (Can be made 6 hours ahead. Let stand at room temperature.)

Serve warm or at room temperature with vanilla ice cream.

Sunday, November 27, 2011

Canja: Portuguese Chicken Soup

This soup is a family classic. My mom has been making it since I was a kid. It is THE go to soup if you feel a cold coming on. What is it about chicken soup that makes your soul feel so damn good?


The soup is called Canja and it's Portuguese standard issue. My mom was raised country style in the mountains. She has 5 brothers and 4 sisters. Growing up, food was not abundant and you had to work with what you had. She and her siblings would literally hang out around the chickens waiting for an egg. Canja is the perfect example of rural Portuguese cuisine.

There are very few ingredients.


It's easy to make.


You need one pot.
 

It's filling. 


And it feeds a ton of people.


I wouldn't call this chicken noodle necessarily but it's pretty darn close. Heck, this is the only way I know how to make chicken soup. It honestly is delicious and I've never met someone who didn't fall in love with it. Oh... and star pasta is my favorite. Eeee!!!

If you have a lot of left over turkey... buy some chicken stock, heat in a small pot, and add turkey meat!

Canja
a family tradition

One whole chicken
Small pasta (I use Star Pasta)
A few chopped carrots
Salt
Black pepper

In a large pot, bring water to a boil with some salt. Go easy- you don't want to oversalt. 

Clean the bird. Rinse in cold water and drain. Add to boiling water and let cook for about 5 minutes. Lower heat to low-medium and put the lid on. Leave there for at least one hour- until the meat easily pulls off. 

Carefully remove the bird. DO NOT DRAIN THE POT. You are looking at home made chicken stock. Leave it be! Let the bird cool until it's easy to handle and go to town. I usually don't include the skin because i'm not a fan of its texture. Shred chicken to pieces and throw back in the big pot of chicken stock. Set the heat to medium. Add the chopped carrots and as much pasta as you want. The amount will vary due to the amount of water and size of chicken. Cook until the pasta is done.

Taste the chicken stock. Does it need salt? Add salt. Sprinkle in some black pepper. If the bird didn't have a lot of fat (fat = flavor), add a tablespoon or two of olive oil.

Monday, November 21, 2011

Crazy Cute: Baked Pumpkin Donuts

Easy now. Thanksgiving is tomorrow. I'm not going to bombard you with suggestions on what to make nor drop cheesy lines about putting a twist on the classics. All I want to say is I hope you have a very happy Thanksgiving, however you celebrate it. 


These super cute baked pumpkin donuts were an afternoon treat after a game of kickball. You're never too old for a game of kickball! They were served with a cup of hot apple cider and a lot of post-game trash talk.


I've only made baked donuts one other time before, so I was pretty excited to give it another go. This recipe has EVERYTHING going for it.


For starters, the flavor is delicious. You can taste the pumpkin clearly and it's lightly spiced. It's kind of cakey and a few are rather filling. Roll the donuts in anything you want! The recipe calls for cinnamon and sugar, but you can sub with honey, raw sugar, or confectioner's sugar.  I did not roll the entire donut in sugary goodness because I enjoyed the actual cake so much.


The ingredients are simple and basic, nothing out of the ordinary. You can find everything you need at the local grocery store. There's surprisingly very little sugar compared to most cakes.

I used a mini donut mold, but a scrap of parchment paper and a zip lock bag does the trick just fine. The batter is thick and easy to work with. Oh! And 10 minutes in the oven? Thank you Jeebus! They're great for sharing (make about 32 mini donuts).


And of course... it's baked. My insane issue with fried food prevails! No oil dunking for these bad boys. 

The fact they're stupid cute may create a slight bias as well! The sheer sight of them makes me smile.

Happy Thanksgiving!

Pumpkin Donuts
from Buns In My Oven

2 cups all-purpose or white whole wheat flour
1/2 cup brown sugar, packed
1 1/2 teaspoons baking powder
1 teaspoon cinnamon
1/2 teaspoon salt
1/4 teaspoon baking soda
1/4 teaspoon ginger
1/4 teaspoon nutmeg
1/8 teaspoon cloves
1/2 cup canned pumpkin
2 eggs
1/4 cup milk
1/4 cup butter, softened
Cinnamon and sugar, for rolling
1/2 cup butter, for dipping

If using a babycakes donut maker, turn it on to preheat. Otherwise, preheat the oven to 375 degrees. Grease a donut pan or regular cookie sheet.

In the bowl of your stand mixer, mix together the dry ingredients.

Beat in the pumpkin, eggs, milk, and butter until well combined.

Fit a pastry bag with a large tip and fill with the donut batter. Alternately, fill a large ziploc bag and snip off the end.

Pipe into the donut maker, donut pan, or just pipe in circles on a greased cookie sheet. The dough is thick enough that it should stay in the general shape you pipe it in while in the oven.

If using the donut maker, cook for about 3-5 minutes, checking for doneness with a toothpick.
If using the oven, bake for about 10-12 minutes or until golden brown and cooked through.

Cool on a wire rack.

Melt the 1/2 cup of butter in a small dish and mix together cinnamon and sugar in a second dish for dipping.
Dip the donuts in the butter and then the cinnamon-sugar mixture.

Store in an air-tight container.

Saturday, November 19, 2011

Cake/Marshmallow Pops

Time is a funny thing. Every week, I hear the same exclamations: "Oh my God, it's only Monday," "Is it Friday yet," and "It's Friday!" The week drags and the weekend is never long enough. Then, without fail, we look at the calender in shock realizing how fast time has gone by. 


It feels like only yesterday I was driving home from my old job off route 1. The sun was beaming bright and at the top of the hill by telegraph, where the road drops downhill. I love that part because it's a great view of the sunset over the trees. There's this massive chimney pipe near the VRE station that exhales white smoke... always makes me think of the Gorillaz "Windmill" music video. Does this story sound familiar?


That's when I got a phone call from my friend/office mate. We had been trying to get together for the past month but our schedules refused to align. I had a suspicion why she wanted to meet up. We said the usual hello's and held my breath, willing her to say "it." That's when Jess dropped the bomb: she was pregnant.


Tori is over a year old now. Blows my mind. She went from being this pink bundle screaming to a beautiful, healthy, cheerful kid that has her mother's eyes- just as I hoped. To celebrate, her parents threw a super cute teddy bear themed party. Aunt Niki made the coolest bday hat ever!! I was in charge of cake pops.


Cake pops are a baking niche. I blame Bakerella. That little lollipop stick at the end of the cake is what defines a bake ball from a cake pop. It adds another dimension of aesthetic to play with. 


You can add ribbons...


Cupcake liners....


 ... and every type of sprinkle under the sun.


They're really easy to make, just a bit time consuming.

Note: Need something cute and in a pinch for time?

Lose the cake part and substitute with marshmallows! They decorate all the same. Dip in the chocolate of your choosing and decorate. These were sweating from the car ride over, but you get the idea. Simple and sincere.


Cake/Marshmallow Pops

1 box chocolate cake mix
1 can of cream cheese frosting
OR-- sub with a bag of marshmallows
1 bag of candy coating (or chocolate chips)
Sprinkles

Make the cake according to the directions on the box. Cool completely. Skip all that cake stuff if you want and sub with marshmallows!

Crumble the cake into a large bowl. Add frosting, starting with 1/2 of the can and mix thoroughly. Add more frosting if needed to make the cake form balls. Roll the cake mixture into balls and place on cookie sheet. Chill them for several hours or freeze for about 30-60 minutes.

Melt chocolate in bowl and roll balls in chocolate or dip marshmallows in chocolate. It helps to add a small amount of shortening to the chocolate for eaisier dipping. Lay balls on wax paper and top with sprinkles before chocolate hardens. I find it easier to melt only 1/2 bag of chocolate at a time in order to keep the chocolate hot and easier to work with.

Once the chocolate has hardened, the balls can be stored in an air tight container at room temperature for about 3-4 days.

Sunday, November 13, 2011

Chewy Sugar Cookies

Sugar cookies: the perfect sweet for any occasion. They're so malleable and diverse, it's a guaranteed win. Want them fancy? Add a touch of almond extract to the batter and frost with a soft pink buttercream. Want them cozy? Add a touch of pumpkin spice and sip some chai. Want them all sorts of confused? Do what we did on Halloween... add coffee extract and cinnamon. What?


This Halloween was awesome. My favorite part was how the day started: a "spat" with the boyfriend. Gasp! Crazy right? Yes, real shit happens. Assumptions were made and feelings got hurt. It can't hurt unless you genuinely care. These are the things that define a relationship. Communication, sincerity, and apologies. Oh and hugs... lots and lots of hugs. I'm one lucky squirrel.


By the end of the day, chill mode was in full effect and we foolishly left the bucket of candy  out for kids in hopes they would only take one. It was ransacked after 3 knocks at the door. Scoundrels! 


Outfits were homemade, of course. They were pretty freaking ghetto. We were SUPPOSED to be Max and Monster from Where the Wild Things Are. I cut his ears too big so he looked like freaking King Yoda. I wanted to wear steam punk goggles more than the monster ears. Drew whiskers and tried to get Autumn in on the action. 


And of course... the sugar cookies. Oh the sugar cookies.


These came out so delicious... and so confused. Much like our costumes. I ran out of vanilla extract- a day never thought possible. That's like running out of salt! I had already sprinkled in some cinnamon for that fall fun. We went for the gusto and used coffee extract and decorated with vanilla butter cream frosting. The grocery store was out of black gel... so blue had to suffice.


They are soft and chewy, rolled in sugar. They're not super chewy, just right and delicious with a cup of milk.  You just can't go wrong with a sugar cookie!

PS. Make sure you listen to this tribute to Heavy D while you make cookies.  Go ahead and dance! No one is watching, and if they are, tell them to take notes.

Chewy Sugar Cookies
from allrecipes

2 3/4 cups all-purpose flour
1 teaspoon baking soda
1/2 teaspoon salt
1 1/4 cups margarine
2 cups white sugar
2 eggs
2 teaspoons vanilla extract
1/4 cup white sugar for decoration

Preheat oven to 350 degrees F (175 degrees C). In a medium bowl, stir together the flour, baking soda, and salt; set aside.

In a large bowl, cream together the margarine and 2 cups sugar until light and fluffy. Beat in the eggs one at a time, then the vanilla. Gradually stir in the dry ingredients until just blended. Roll the dough into walnut sized balls and roll the balls in remaining 1/4 cup of sugar. Place cookies 2 inches apart onto ungreased cookie sheets and flatten slightly.

Bake for 8 to 10 minutes in the preheated oven, until lightly browned at the edges. Allow cookies to cool on baking sheet for 5 minutes before removing to a wire rack to cool completely.

Wednesday, November 9, 2011

Apple Raisin Filled Cinnamon Buns

Snowmageddon 2010 marked a very important event in my life: the first attempt at cinnamon buns. Work was shut down for an entire week and I was running rampant in mom's kitchen. There was a can of pumpkin in the cupboard and dash of creativity in my head. Held my breath and let Recipe Girl pop my cinnamon bun cherry with Amish Pumpkin Cinnamon Buns. No, they didn't come out perfect, but it was absolutely inspiring. 


Since then, I've made quite a few cinnamon buns. They're just so magical and warm. I love trying all the different variations- it is a never ending quest to find the perfect batch. Each attempt is a lesson learned.


This round, I put a spin on Smitten's classic version of cinnamon buns by incorporating fall flavors. I don't mean to hold onto her skirt- but her recipes are fail proof. I don't know how she does it. The only thing I added to the dough itself was cinnamon. 


The real ramp up was the filling. Chopped up apples and raisins with spice oozing out the edges. Seriously, there was no way in hell this could have gone wrong. Serve with vanilla ice cream if you're really going for the gusto!
 

The bread is super soft and lightly spiced. Wrapped in filling, it was delightful to pull apart this labyrinth of flavor. It was gooey and each ingredient complemented the other. You don't even need a glaze!  However, if you insist, I recommend a cream cheese with cinnamon, maple glaze, or a nice caramel coat.


Note, the rising time of these rolls is double most recipes I have used. I think this is because the yeast is mixed into the dry ingredients rather than settling in the warm milk and butter. They are messy to make and you have to roll slowly. Brace yourself for a well worth wait!

Apple Raisin Filled Cinnamon Buns

Dough
1 cup whole milk
3 tablespoons unsalted butter
3 1/2 cups (or more) unbleached all purpose flour, divided
1/2 cup sugar
2 tablespoons cinnamon
1 large egg
2 1/4 teaspoons rapid-rise or instant yeast (from 1 envelope yeast)
1 teaspoon salt
Nonstick vegetable oil spray

Apples
5-6 apples, peeled, cored, and chopped
3 teaspoons ground cinnamon
1 tablespoon granulated sugar
1 1/2 teaspoons ground nutmeg
1 teaspoon ground ginger
1/2 -1 cup raisins


Filling
3/4 cup (packed) golden brown sugar
2 tablespoons ground cinnamon
1/4 cup (1/2 stick) unsalted butter, at room temperature
Pinch of salt

Combine milk and butter in glass measuring cup. Microwave on high until butter melts and mixture is just warmed to 120°F to 130°F, about 30 to 45 seconds. Pour into bowl of stand mixer fitted with paddle attachment. Add 1 cup flour, cinnamon, sugar, egg, yeast, and salt. Beat on low speed 3 minutes, stopping occasionally to scrape down sides of bowl. Add additional 2 1/2 cups flour. Beat on low until flour is absorbed and dough is sticky, scraping down sides of bowl. If dough is very sticky, add more flour by tablespoonfuls until dough begins to form ball and pulls away from sides of bowl. Turn dough out onto lightly floured work surface. Knead until smooth and elastic, adding more flour if sticky, about 8 minutes. (You may also use a KitchenAid’s dough hook for this process.) Form into ball.

Lightly oil large bowl with nonstick spray. Transfer dough to bowl, turning to coat. Cover bowl with plastic wrap, then kitchen towel. Let dough rise in warm draft-free area until doubled in volume, about 2 hours.

While waiting- bake the apples. Heat oven to 350. For the apples, mix the ingredients together in a small bowl. Lightly grease a baking tin and add apples. Bake for 15 minutes.  

For the filling, use a mixer to blend the ingredients together. It will be fluffy- you're going to use it as a paste to make rolling the cinnamon buns easier.

Press down dough. Transfer to floured work surface. Roll out to 15×11-inch rectangle. Spread filling over dough, leaving 1/2-inch border. Sprinkle apples over dough. Starting at the longer side, roll dough into log, pinching gently to keep it rolled up. With seam side down, trim ends straight if they are uneven (we baked them in a ramekin, incapable of discarding such deliciousness) cut remaining dough crosswise with thin sharp knife (a good serrated worked well here) into 18 equal slices (each about 1/2 to 3/4 inch wide).

Spray two 9-inch square glass baking dishes (an 8-inch square metal pan worked just fine, too) with nonstick spray. Divide rolls between baking dishes, arranging cut side up (there will be almost no space between rolls). Cover baking dishes with plastic wrap, then kitchen towel. Let dough rise in warm draft-free area until almost doubled in volume, 40 to 45 minutes, though yours, like mine, may take longer. Don’t skimp on the double-rising time.

Position rack in center of oven and preheat to 375°F. Bake rolls until tops are golden, about 20 minutes. Remove from oven and invert immediately onto rack. Cool 10 minutes. Turn rolls right side up.

Saturday, November 5, 2011

Baked Coconut Shrimp

Shrimp = three dollars and touch of class. Having a nice dinner doesn't mean you gotta make it rain at the grocery store. Pick up a few shrimp (about three dollars worth), rub them down in coconut and cayenne,  then bake. It's magical.


The best part is you determine the flavor. If you don't want that heat- go easy on the cayenne. If you don't want it too sweet, mix the sweetened coconut with some unsweetened coconut. Or, you can go middle route as we did! Love that heat! Gotta make those taste buds tingle. I added extra cayenne and kept the sweetened coconut. It was a perfect balance of sweet and savory.


The only thing I did different was soak the shrimp in unsweetened coconut milk mixed with some cayenne pepper over night in the fridge.  I don't know if this made a major difference but I wanted to ensure that the coconut was an overall flavor- not just the flakes. Infuse that heat!


My favorite thing about this recipe is that the shrimp is baked. Baked! Not fried! The texture is awesome and crispy without all the oil! It bakes crazy quick too. I could chow down with a clear conscious and an easy to clean kitchen.


This can be served as appetizers or a meal. I went with a tropical theme. There was some left over rice so I made my usual fried rice (which doesn't really involve measurements) and added chunks of pineapple, mango, and papaya. You can a convenient package of this fruit all nice and fresh at Trade Joe's. It made a tasty farewell to summer meal.


Baked Coconut Shrimp

1 pound large shrimp, peeled and deveined
1/3 cup cornstarch
1 teaspoon salt
3/4 teaspoon cayenne pepper
2 cups flaked sweetened coconut (or half unsweetened)
3 egg whites, beaten until foamy

*optional: soak in unsweetened coconut milk mixed with cayenne pepper the night before

Preheat an oven to 400 degrees F (200 degrees C). Lightly coat a baking sheet with cooking spray.
Rinse and dry shrimp with paper towels.

Mix cornstarch, salt, and cayenne pepper in a shallow bow; pour coconut flakes in a separate shallow bowl. Working with one shrimp at a time, dredge it in the cornstarch mixture, then dip it in the egg white, and roll it in the coconut, making sure to coat the shrimp well. Place on the prepared baking sheet, and repeat with the remaining shrimp.

Bake the shrimp until they are bright pink on the outside and the meat is no longer transparent in the center and the coconut is browned, 15 to 20 minutes, flipping the shrimp halfway through.